In This Article
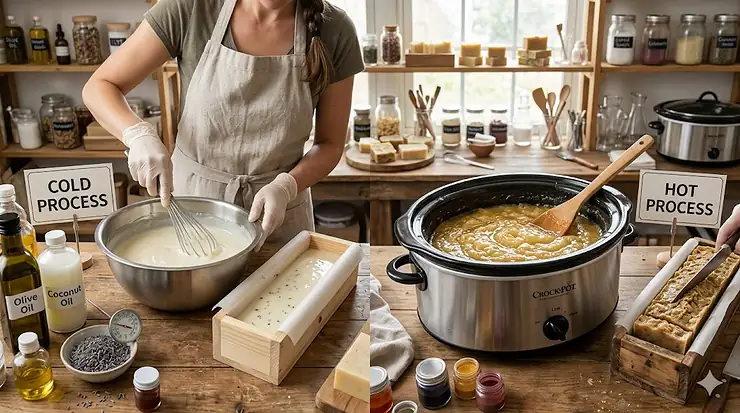
If you’ve ever stood in your kitchen staring at a pot of oils and a bag of lye, wondering whether to cook it or pour it and wait six weeks — welcome to the great hot process vs cold process debate. It’s the soap-making equivalent of sourdough vs instant yeast. Both produce something you love, but the journey is wildly different.
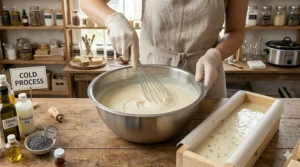
Here’s the 40-word version if you need it fast: hot process soap is cooked (usually in a slow cooker) until saponification completes, making it usable within days. Cold process soap is mixed without added heat, poured into molds, and needs 4–6 weeks to cure — but rewards patience with silky, swirled, magazine-cover-worthy bars.
But which method actually works better for you? That depends on your skin type, your schedule, your budget, and honestly — your personality. The methodical, detail-loving crafter tends to gravitate toward cold process. The person who wants results by Thursday leans hot. Neither camp is wrong.
In this guide, I’ll walk you through the real differences between these two soap making methods — not just the chemistry, but the lived experience of doing them — and then review the 7 best kits and supplies currently available on Amazon to get you started (or level up) with either approach. From beginner-friendly all-in-one kits to professional-grade lye and tools, there’s something here for every skill level and budget.
Let’s make some soap.
Quick Comparison: Hot Process vs Cold Process at a Glance
| Feature | Hot Process (HP) | Cold Process (CP) |
|---|---|---|
| Heat required | Yes (slow cooker/oven) | No external heat |
| Cure time | 1–7 days | 4–6 weeks |
| Texture | Rustic, handmade look | Smooth, swirled designs |
| Fragrance retention | Lower (heat degrades some scents) | Higher (added at lower temps) |
| Lye safety | Saponification fully complete | Continues during cure |
| Beginner friendliness | ★★★★☆ | ★★★☆☆ |
| Customization level | Moderate | Very High |
| Best for | Functional, natural bars | Artisan, gift-worthy bars |
What this table is really telling you: if you care about Instagram-worthy swirls and intricate designs, cold process wins by a mile. But if you want to actually use your soap this weekend — especially if you’re making something for sensitive skin where you want zero lye uncertainty — hot process is the smarter, safer choice for beginners. The rustic hot process soap aesthetic has its own earthy charm too; don’t underestimate it.
💬 Just one click — help others make better buying decisions too! 😊
Top 7 Soap Making Kits & Supplies: Expert Analysis
1. HSHIN Cold Process Soap Making Kit
This is the kit that actually thinks like a soap maker. The HSHIN Cold Process Soap Making Kit bundles everything a first-timer could possibly need — stainless steel mixing bowls, a silicone loaf mold, thermometer, soap cutter, measuring cups, a digital scale, and even 20 packaging boxes. Open the box, read the instructions, and you’re already halfway there.
The stainless steel bowls matter more than people realize. Cheap plastic bowls can warp or react unpredictably with the heat of a lye solution — using SS from the start means you’re building proper habits, not bad ones. The included digital scale also deserves a callout: soap making is a chemistry project. Measuring by volume rather than weight is the #1 beginner mistake that leads to lye-heavy bars, and this kit removes that trap entirely.
Who is this for? Any adult who’s genuinely curious about cold process soap making and doesn’t want to hunt down ten separate items on Amazon. It’s also a thoughtful gift for the DIY crafter in your life — the kind of person who reads ingredient labels on commercial soap and grimaces.
Customer feedback consistently praises the completeness of the set and quality of the silicone mold. The main complaint: no oils or lye are included, so you’ll need to source those separately (see Product #4 for lye).
✅ True cold process setup — not melt & pour disguised as CP
✅ Safety gear (gloves, etc.) included
✅ 20 packaging boxes — ready to gift immediately
❌ No oils or lye included
❌ Instructions assume some prior research
💰 Price range: $30–$50 | Value verdict: One of the most complete tool kits at this price point for genuine cold process work.
2. Wild Herb Soap Co. Cold Process Soap Making Kit
Wild Herb Soap Co. did something clever: they actually included the oils. The kit ships with Palm Kernel Flakes, Coconut Oil, Extra Virgin Olive Oil, Mango Butter, and Vitamin E — the exact oil profile that makes a bar moisturizing without feeling greasy. You can even choose add-ins like crushed oats, Arizona raw honey, lavender buds, or chamomile flowers depending on your skin goals.
The nut-free formula is a genuine differentiator. Most cold process oil blends rely on sweet almond or hazelnut oil — this one doesn’t, making it viable for households with nut allergies. And because cold process soap retains its natural glycerin (commercial soap manufacturers often strip this out and sell it separately), you’re getting a bar that actively moisturizes rather than just cleansing.
The kit makes approximately 1 lb of soap — a solid learning batch. That’s about 4–6 bars depending on your mold. Enough to practice, enough to keep some for yourself and still have some to share.
This one is ideal for the skincare-conscious beginner: someone who wants to know exactly what’s touching their skin and why.
Customer reviews love the quality of the ingredients and the fact that the resulting soap is actually excellent — not just educational. A few note that the instructions are basic and assume you’ve watched a tutorial first.
✅ Oils included — rare for a true CP kit
✅ Nut-free formula for sensitive households
✅ Natural glycerin preserved in final bar
❌Makes only 1 lb — small batch
❌ Instructions could be more detailed for absolute beginners
💰 Price range: $20–$35 | Value verdict: The best starting kit if skin sensitivity and ingredient transparency are your top concerns.
3. BOOWAN NICOLE Hot Process Soap Making Kit
Here’s your hot process entry point, and BOOWAN NICOLE brings serious credentials: 16 years designing silicone molds and homeware, with FDA and CE-certified food-grade platinum silicone. The 42 oz rectangular loaf mold at the center of this 33-piece kit is the kind of quality you’d expect from a specialty soap supply store, not a general Amazon listing.
The kit includes 500g x 2 packs of soap base (1kg total), 6 mica powder colorants, 6 essential oils, a soap cutter, measuring cups (both 50ml and 1000ml), silicone scrapers, a thermometer, gloves, a whisk, loofah slices, and wrapping paper. It’s marketed as a hot process kit but the included soap base makes it technically closer to a melt-and-pour setup — which is actually perfect for absolute beginners who want to understand color and fragrance without worrying about lye chemistry on their first attempt.
Think of it this way: if you’re the type who wants to produce beautiful, handmade-looking bars this weekend while learning the basics of temperature management and design, this kit delivers exactly that. The jump to true hot process (with raw oils and lye) is a natural next step once you’re comfortable.
Customer feedback consistently applauds the silicone mold quality — it flexes cleanly, doesn’t retain odors, and demolds with a satisfying pop. The essential oils are noted as genuinely fragrant, not the artificial-smelling kind.
✅ FDA/CE-certified platinum silicone mold
✅ Complete 33-piece set — nothing left to buy
✅ Includes loofah slices for exfoliating bars
❌ Soap base included, not raw oils — not true HP from scratch
❌ Mica colors are limited to 6; serious crafters will want more
💰 Price range: $35–$55 | Value verdict: Best hot process-adjacent kit for beginners who want gorgeous results immediately.
4. Essential Depot Food Grade Sodium Hydroxide Lye (2 lbs)
Let’s talk about the ingredient that makes everything possible and scares everyone away: lye. Without sodium hydroxide (NaOH), there is no soap — period. Every bar of soap ever made required lye in the process. The difference between commercial soap and handmade soap is largely about what happens after saponification.
Essential Depot’s lye is Food Grade, USP-certified, non-GMO, and made in the USA — which is a bigger deal than it sounds. Many cheaper lye products are technical grade, meaning they contain impurities that can interfere with saponification and leave unpredictable residue in your finished bars. The micro-bead (micro-pel) format is also genuinely superior to flakes or coarse beads: because each particle is evenly sized, they dissolve at a consistent rate, which means more reliable saponification whether you’re doing hot process or cold process soap.
According to the FDA’s guidance on cosmetics and soap regulation, the lye itself is consumed in the chemical reaction and no sodium hydroxide remains in properly cured soap — reassuring for those new to working with it.
The HDPE bottle with a child-resistant, resealable cap keeps moisture out between batches, which is critical since lye is hygroscopic (it absorbs moisture from the air and can degrade over time). Store it sealed, in a cool dry place, and it’ll last through dozens of batches.
Customer feedback across thousands of reviews calls this the gold standard for home soap making lye. Many soap makers reorder in the 10 lb bottles once they’re confident in their process.
✅ Food grade — lower impurities than technical grade alternatives
✅ Evenly-sized micro beads for consistent saponification
✅ USA-made, non-GMO, no added chemicals
❌ Ships ground only (no air freight for lye)
❌ Requires careful storage and handling — not beginner-proof without proper safety gear
💰 Price range: $10–$20 for 2 lbs | Value verdict: Non-negotiable if you’re making true cold process or hot process soap from scratch.
5. Hula Home Premium Soap Making Kit
The Hula Home kit earns its spot on this list for one reason above all others: it works equally well with melt and pour, cold process, and hot process soap. That kind of versatility is rare. The 44oz silicone mold rated for -20°F to +446°F (-6°C to +230°C) means it can survive the cooking temperatures of hot process without warping, which rules out most cheap silicone molds on the market.
The complete set includes the silicone insert, a bamboo cutter box, a pine soap-holding box, stainless straight and wavy slicers, and 100 plain bags for packaging. The wavy slicer, in particular, is a small detail that makes a big difference in presentation — those gentle ridges on the top of a soap bar are what elevate a homemade bar from “functional” to “I could sell this at the farmers’ market.”
The dishwasher-safe claim is actually meaningful here: cleaning a mold after hot process soap is notoriously annoying (the cooked soap clings), and being able to just throw this in the dishwasher saves real time.
Who is this for? The maker who’s already made a batch or two and wants a proper, reusable, long-term mold setup instead of improvising with cardboard boxes.
Customer feedback is overwhelmingly positive on mold quality and the bamboo cutting box. A few note the bags could be thicker.
✅ Temperature-rated for true hot process use
✅ Wavy + straight cutters included for professional presentation
✅ Dishwasher-safe silicone
❌ No soap base or ingredients included
❌ Bags are basic — not branded-ready
💰 Price range: $25–$40 | Value verdict: The best standalone mold-and-cutter kit for serious soap makers doing both HP and CP.
6. Pifito Soap Making Kit (Goats Milk, Honey & Castile)
Pifito occupies an interesting niche: this is a melt-and-pour kit, not true hot process or cold process — but it earns its place in this comparison as the baseline. Understanding melt and pour helps you appreciate why the other two methods exist.
The kit includes 3 lbs of soap base (1 lb each of Goat’s Milk, Honey, and Castile), 8 oxide pigment colorants, a silicone mold, and instructions. The soap bases consist of coconut oil, palm oil, safflower oil, glycerin, water, and sodium hydroxide — but the saponification has already happened. You’re not making soap from scratch; you’re customizing an already-made soap base.
What most buyers overlook about this kit: Pifito’s soap base actually preserves the glycerin (many commercial bases strip it), so the resulting bars are genuinely moisturizing. The three base varieties also give you a nice sensory education — goat’s milk bases feel creamier and more conditioning, honey bases have a natural golden warmth and mild exfoliating effect, and Castile (olive oil-based) is the gentlest of the three.
This is the right entry point if you have kids involved, if you’re apprehensive about working with lye, or if you just want to make beautiful soap gifts without a chemistry lesson first.
Customer feedback praises the richness of the goat’s milk base in particular and the variety of colorants.
✅ No lye handling required — great for families
✅ Three different base types for comparison and variety
✅ Natural glycerin preserved in all bases
❌ Not true handmade soap — saponification already done
❌Colorants are limited; oxide pigments can streak if not mixed well
💰 Price range: $15–$25 | Value verdict: Best introductory kit if lye feels too intimidating right now — a legitimate stepping stone.
7. OVENTE Immersion Hand Blender 300W (HS560B)
You could technically soap without a stick blender. Soap makers before 1990 did it by hand for hours. But here in 2026, we have better things to do.
The OVENTE HS560B is a 300W corded immersion blender with stainless steel blades, two-speed settings, a pulse control, and a detachable, dishwasher-safe shaft. For soap making specifically, that stainless steel shaft is essential — plastic shafts can crack under repeated lye exposure and heat, while stainless holds up batch after batch. The two-speed setting gives you control at trace: use low speed to start combining your oils and lye solution, then pulse to full speed when approaching the trace point so you don’t accidentally over-trace into a seized, unusable batch.
At 300W, this is enough motor for most beginner-to-intermediate batches (2–4 lbs). Serious production soapers making 10+ lb batches per session will eventually want something more powerful (the Vitamix immersion blender is the professional choice), but for weekly hobby batching, the OVENTE is the workhorse that doesn’t break the bank.
The slim design fits comfortably in a standard-sized mixing bowl or pot, which matters more than you’d think when you’re trying to keep the blender head submerged to avoid splashing caustic batter.
Customer feedback consistently highlights durability and easy cleanup. The cord length occasionally frustrates those with awkward kitchen setups.
✅ Stainless steel shaft — lye-resistant and durable
✅ Pulse + 2-speed control for trace management
✅ Dishwasher-safe detachable shaft
❌ 300W is sufficient but not powerful for large commercial batches
❌ Fixed cord length can be limiting
💰 Price range: $20–$35 | Value verdict: The smartest budget stick blender for soap making — not glamorous, but genuinely reliable.
📊 Products at a Glance
| Product | Method Suited For | Price Range | Best For |
|---|---|---|---|
| HSHIN Cold Process Kit | Cold Process | $30–$50 | CP beginners (tools only) |
| Wild Herb Soap Co. Kit | Cold Process | $20–$35 | Sensitive skin; oils included |
| BOOWAN NICOLE HP Kit | Hot Process/M&P | $35–$55 | Beginners wanting quick results |
| Essential Depot NaOH Lye | HP & CP | $10–$20 | All from-scratch soap makers |
| Hula Home Mold Kit | HP, CP & M&P | $25–$40 | Upgrading to proper molds |
| Pifito M&P Kit | Melt & Pour | $15–$25 | Families; lye-free intro |
| OVENTE HS560B Blender | HP & CP | $20–$35 | Anyone making from-scratch soap |
The takeaway: if you’re starting from scratch with real cold process or hot process soap, grab the Essential Depot lye, the HSHIN or Wild Herb kit for tools/ingredients, and the OVENTE blender. That’s a complete from-scratch setup for under $90. If you want to skip lye entirely to start, the BOOWAN NICOLE or Pifito kits get you beautiful results immediately.
✨ Don’t Miss These Exclusive Deals!
🔍 Take your soap making game to the next level with these carefully selected products. Click on any highlighted product name to check current pricing and availability on Amazon — these tools will help you create authentic, skin-nourishing bars your whole household will love!
How to Actually Choose Between Hot Process and Cold Process: A Practical Guide
This is the question that search engines keep trying to answer with oversimplified tables. Let me give you the real answer.
Step 1: How patient are you, actually? Don’t romanticize the wait. Cold process soap needs 4–6 weeks to cure. That’s not a suggestion — it’s chemistry. Cutting that time short means bars with higher residual alkalinity that can irritate skin. If you have the patience of a hobbyist baker, CP is yours. If you need results fast (say, you promised soap gifts for an event three weeks away), hot process is your friend.
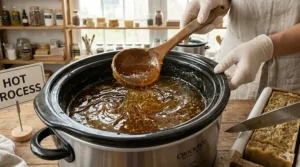
Step 2: What does the finished bar need to look like? Cold process wins every aesthetic competition. The fluid batter allows swirls, layers, embeds, and ombre designs that hot process simply can’t match. Hot process batter is thick and lumpy — like cooked mashed potatoes — by the time it goes into the mold. The rustic hot process soap look is genuinely beautiful in its own way (think farmhouse chic), but if your goal is artisan-market-worthy swirled bars, CP is your method.
Step 3: Who’s the soap for? If you’re making soap for someone with very sensitive or reactive skin, hot process is technically the safer choice. Because saponification is complete before the soap is molded, there’s no active lye in the bar from day one. Cold process bars rely on proper cure time to achieve the same safety — which is fine if you control the curing environment, but adds a variable.
Step 4: What’s your fragrance situation? Essential oils and fragrance oils behave better in cold process because they’re added at lower temperatures. Heat degrades certain fragrance compounds — particularly top notes like citrus. In hot process, some scents just vanish in the slow cooker. If building a specific fragrance profile matters to you (lavender-eucalyptus, say, or rose and sandalwood), cold process preserves those notes more faithfully.
Step 5: Do you have a slow cooker you don’t mind dedicating to soap? Hot process requires a Crock-Pot or slow cooker. Once you’ve used it for soap (lye + oils), it develops etching from the stick blender and residual chemical exposure — you really shouldn’t use it for food afterward. If sacrificing a slow cooker is a barrier, cold process has the lower equipment overhead.
Step 6: What’s your experience level? Counterintuitively, hot process is slightly more forgiving for beginners. Because you’re cooking the soap until it’s done, you can test for completion (the classic “zap test” — touching a tiny bit of soap to the tip of your tongue; if it zaps like a battery, it needs more time). Cold process offers no such real-time feedback; you pour it, mold it, and trust the chemistry.
Rustic Hot Process Soap vs Artisan Cold Process: A Real-World Case Study
Meet three different soap makers and the method that actually fits their lives.
The Weekend Warrior (Sarah, school teacher, two kids): Sarah wants to make lotion bars and soap for Christmas gifts in early December. She starts in mid-November. Cold process with its 4–6 week cure means she’d need to start in October — which didn’t happen. Hot process is her answer. She picks up the BOOWAN NICOLE kit for her first attempt, graduates to Essential Depot lye and a proper Hula Home mold by her second batch, and produces 30+ rustic oatmeal-honey bars in a weekend. They’re wrapped and under the tree by December 15th.
The Skincare Geek (Marcus, eczema sufferer, researches every ingredient): Marcus isn’t in a hurry. He wants to formulate a bar with a precise oil blend — shea butter, hempseed, and avocado oil — that he’s calculated will hit a 5% superfat perfect for his compromised skin barrier. He needs the design freedom of cold process, the glycerin retention, and full ingredient control. He starts with the Wild Herb Soap Co. kit to get his technique right, then sources his oils and lye separately (Essential Depot for lye, always). His bars cure for 5 weeks. The result? The first soap he’s used in years that doesn’t make him itch.
The Craft Business Owner (Leila, Etsy shop, 50 orders a month): Leila does both. She makes cold process bars for her signature swirled collections — the ones that photograph beautifully for her Etsy listings. She uses hot process for her unscented “sensitive skin” line, where she needs the safety certainty of fully saponified soap and doesn’t care about visual complexity. The Hula Home mold handles both methods perfectly, and she reorders Essential Depot lye in 10 lb bottles.
The lesson: there’s no superior method, only the superior method for your situation.
The Chemistry Made Simple: What “Processing” Actually Does
If the word “saponification” makes your eyes glaze over, this section is for you. (For a detailed technical breakdown, the Wikipedia article on soap is actually excellent and worth a read.)
Here’s the core: when you mix oils (fats, technically triglycerides) with sodium hydroxide (lye) dissolved in water, a chemical reaction occurs. The lye breaks apart the fat molecules and rearranges them into two products: soap molecules (sodium salts of fatty acids) and glycerin. This is saponification.
In cold process, you initiate this reaction by mixing and then let it complete over weeks in the mold. The soap is “raw” when poured — active lye is still reacting with oils. By the time your 4–6 weeks are up, all the lye has been consumed and you have a cured, safe, mild bar.
In hot process, you apply heat (usually 180–200°F in a slow cooker) to force saponification to completion in 1–3 hours. You can literally watch the batter go through stages — from trace, to applesauce texture, to mashed potatoes, to Vaseline-like gloss — as the reaction finishes. When the batter reaches that shiny, translucent “Vaseline stage,” saponification is done. The soap is safe the moment it cools.
Neither method uses lye as a final ingredient. As Wellness Mama’s soap chemistry overview explains, there is no unreacted lye remaining in properly made soap — it’s entirely consumed in the reaction. This is the fact that most soap-curious beginners don’t know, and it transforms lye from “terrifying chemical” to “necessary catalyst.”
What to Expect: Real-World Soap Performance
Specs are one thing. What do these bars actually feel like on your skin?
Lather: Both methods produce comparable lather if the oil blend is the same. Coconut oil drives a big, bubbly lather; olive oil produces a creamier, more lotion-like lather. Hot process bars often lather slightly faster initially because the bar’s outer surface is already fully saponified — no need to “break in” the bar. Cold process bars sometimes improve in lather quality as they continue to cure past the 6-week minimum.
Skin feel: Cold process soap is generally silkier on the skin. The slower cure allows the crystalline soap structure to develop more fully, producing finer-textured bars. Hot process bars can feel slightly more rustic in texture — not rough, but denser and more utilitarian.
Longevity in the shower: Both methods produce longer-lasting bars than commercial soap when properly cured, primarily because the glycerin is retained (glycerin in commercial soap is extracted and sold separately). A properly cured handmade bar should outlast a commercial bar by 50–100% if allowed to drain dry between uses.
Fragrance longevity: Cold process wins here. Fragrances added to cooled CP batter are locked into the soap matrix during the gel phase. Hot process fragrances — especially delicate florals and citruses — can cook off during saponification. Hot process soap makers often add essential oils after cooking (during the molding stage) to compensate, which helps but doesn’t fully replicate CP fragrance complexity.
Common Mistakes When Making Hot Process and Cold Process Soap
Every batch teaches you something. Here are the lessons that usually cost beginners a batch.
Mistake #1: Using the wrong thermometer. In cold process, temperature matters more than most recipes admit. You want your lye solution and oils within 10°F of each other (usually both around 100–110°F) before combining. Using a candy thermometer versus an instant-read digital thermometer can mean wildly inaccurate readings. Invest in a proper digital probe — the HSHIN kit includes one; if yours doesn’t, grab one separately.
Mistake #2: Measuring by volume instead of weight. This bears repeating. A cup of coconut oil does not equal a cup of olive oil in mass. The lye calculator SoapCalc is the industry standard, free, and extremely reliable) works in ounces or grams — always weigh your ingredients.
Mistake #3: Adding fragrance at the wrong time in hot process. Add essential oils after the cook is complete and the soap has cooled slightly to below 180°F. Adding them earlier means you’re literally boiling off your expensive lavender oil.
Mistake #4: Underestimating cure time in cold process. “My bars are hard, so they must be done.” No. Hardness ≠ cured. A fresh CP bar can be firm to the touch but still have elevated pH. The 4–6 week timeline is for chemistry, not just physics.
Mistake #5: Using any lye that isn’t 100% pure sodium hydroxide. Some drain cleaners are mostly lye — but “mostly” isn’t good enough for soap. The Essential Depot lye is 100% pure NaOH with a Certificate of Analysis available on request. That’s the standard to hold.
Features That Actually Matter (And Those That Don’t)
Soap making marketing is full of noise. Here’s what experienced soap makers actually care about.
Actually matters:
- 🧪 Lye purity — food grade vs technical grade is a real difference
- ⚖️ Scale accuracy — 0.1g precision for small batches; 1g is fine for larger ones
- 🌡️ Thermometer reliability — digital probe, not dial
- 🧴 Mold material — silicone handles HP heat; cheaper rubber does not
- ⚡ Stick blender wattage — 300W+ for batches over 2 lbs
Doesn’t matter nearly as much as advertised:
- 🎨 “Premium” colorant brands — mid-range micas and oxides produce identical results
- 🪵 Fancy wooden molds — beautiful, but silicone is more practical
- 📱 App-connected scales — unnecessary complexity; a reliable digital kitchen scale is all you need
- 🫙 Branded fragrance kits — you can source better fragrance oils separately for less
FAQ
❓ Is hot process soap better for sensitive skin than cold process?
❓ What is hot process soap, exactly?
❓ Can I use the same recipe for both hot process and cold process soap?
❓ What does rustic hot process soap look like?
❓ How long does hot process soap need to cure?
Conclusion
Here’s the bottom line on hot process vs cold process soap: there’s no wrong answer — just wrong expectations.
Choose hot process if you want a bar you can use (or give) within the week, if skin safety certainty matters to you, or if the rustic hot process soap aesthetic fits your aesthetic. It’s faster, more forgiving, and every bit as natural.
Choose cold process if you’re driven by design, fragrance complexity, and the deeply satisfying patience of craft. The 4–6 week wait isn’t punishment; it’s part of the ritual. And the resulting bars — silky, intricately swirled, long-lasting — are worth every day of it.
Either way, start with quality ingredients. The Essential Depot lye and a reliable silicone mold will serve you better than any all-in-one kit with questionable materials. Build your setup methodically, weigh everything, and respect the chemistry.
Soap making is one of those rare hobbies where the learning curve and the reward curve are exactly proportional. Every batch — even the lumpy first one — teaches you something. And eventually, you’ll make a bar so good you genuinely won’t be able to go back to commercial soap again.
✨ Don’t Miss These Exclusive Deals!
🔍 Ready to start making your own bars? Click on any product name in this guide to check current pricing and availability on Amazon. Whether you’re going hot process, cold process, or starting with melt and pour — these picks will help you create authentic, skin-loving soap that your family and friends will actually want to use!
Recommended for You
- 7 Best Products for Cold Process Soap Makers in 2026
- 7 Best Authentic French Milled Soaps for Luxurious Skin in 2026
- 7 Best Triple Milled Soap for Men 2026 (Premium Quality)
Disclaimer: This article contains affiliate links. As an Amazon Associate, I earn from qualifying purchases. If you purchase products through these links, we may earn a small commission at no additional cost to you.
✨ Found this helpful? Share it with your friends! 💬🤗